Awareness Tips

How to Choose a Soap Making Method – Guides

How to Choose a Soap Making Method - Guides

Soap making has been a beloved craft for centuries, allowing creators to produce their own custom soaps for personal use or small businesses. But with so many different soap-making methods available, how do you know which one is best for your needs? Whether you are looking for an easy, quick method, or you prefer to master a more intricate and customizable process, this guide will help you understand the different soap-making techniques and their pros and cons. we will discuss four primary soap-making methods: cold process, hot process, melt and pour, and rebatch soap making. Each method has its unique characteristics, and the choice depends on your preferences, skill level, and the type of soap you want to create.

Melt-and-Pour Bases for Beginners

Using melt-and-pour bases is a beginner-friendly approach to soap making. Unlike making soap from scratch through cold processing, the melt-and-pour process doesn’t require handling lye and other raw chemicals. To craft your soap, melt the solid soap base, stir in your additives, and let the mixture set in your preferred molds. These meltable bases allow you to add a variety of soap making supplies to your products, including fragrances, colors, and dry botanicals. Some melt-and-pour soap bases are clear or low-sweat, and they feature oils, butters, honey, and other ingredients for added moisture.

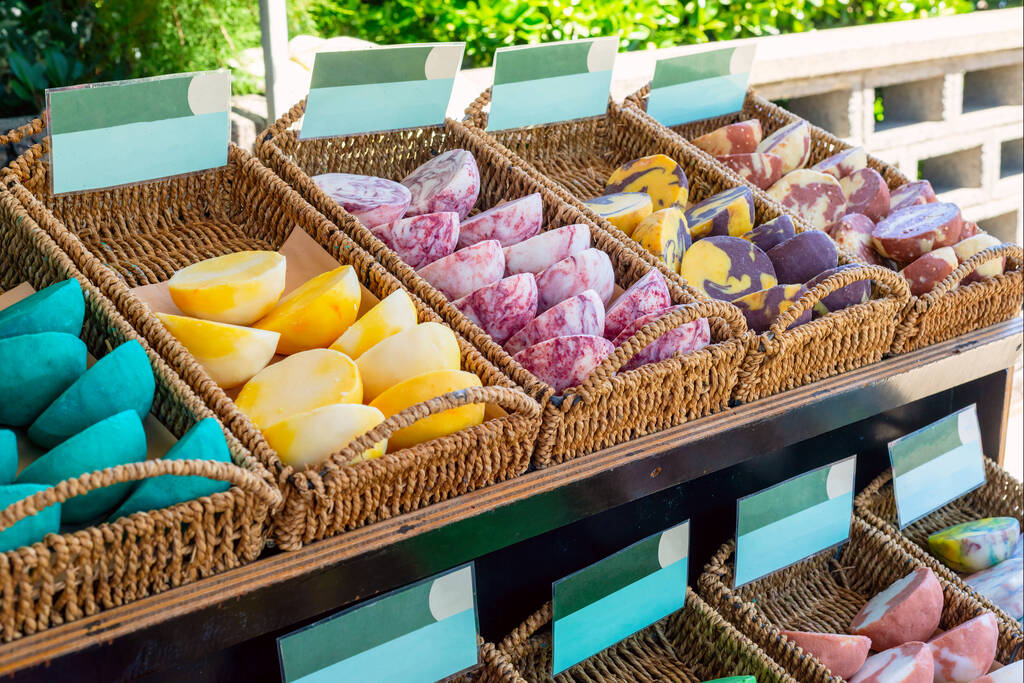
Apothecary shops offer a variety of melt-and-pour soap base options, including those made from shea butter, glycerin, coconut, and goat milk.

You can also find aloe vera and oatmeal bases, as well as mixed blends and layered options. Each soap base delivers unique benefits, such as moisturizing dry skin, soothing sunburns and irritation, and fighting acne-causing bacteria.

Melt-and-pour soaps allow you to customize your final products using custom molds.

You may also use colorants to create layers, swirls, or other visual effects as you pour the soap. Once formed, the soap sets quickly, allowing you to use it within the same day.

Cold and Hot Processes for Control

Cold Process Soap Making

What Is Cold Process Soap Making?

Cold process soap making is the traditional and most natural method of creating soap. It involves combining oils or fats with a strong alkali solution, usually sodium hydroxide (lye), to start the chemical reaction known as saponification. This method does not require heat to trigger the chemical reaction, hence the term “cold process.”

Advantages of Cold Process Soap Making

  • Complete Control over Ingredients: You can choose every ingredient in the soap, from oils to fragrances, making it a highly customizable method.
  • Long-lasting Soap Bars: Cold process soap cures for several weeks, leading to a firmer and longer-lasting bar.
  • Natural and Gentle on Skin: You can use all-natural oils, herbs, and botanicals, which are perfect for sensitive skin.

Challenges of Cold Process Soap Making

  • Long Curing Time: After pouring the soap into molds, it needs to cure for 4-6 weeks, which can be a bit inconvenient for those who want instant results.
  • Lye Handling: Since lye is caustic and must be handled carefully, cold process soap making can be intimidating for beginners.

How to Make Cold Process Soap

  1. Gather Ingredients: You will need oils (like coconut, olive, or palm oil), sodium hydroxide (lye), water, and optional additives such as essential oils, herbs, or colorants.
  2. Mix Lye and Water: Carefully add lye to water (never the other way around) and stir until dissolved. Always wear gloves and goggles to protect your skin and eyes.
  3. Prepare Oils: Melt your solid oils (like coconut or shea butter) and mix them with your liquid oils (like olive oil).
  4. Combine Lye and Oils: Once both the oils and lye solution have cooled to around 100°F, slowly pour the lye solution into the oils and stir well.
  5. Blending to Trace: Use an immersion blender or a whisk to mix the soap until it thickens to a pudding-like consistency known as trace.
  6. Pour into Molds: Once trace is reached, pour the soap mixture into molds and cover it to insulate it for 24-48 hours.
  7. Curing: After removing from the molds, cut the soap into bars and allow it to cure for 4-6 weeks before using.

Tips for Cold Process Soap Making

  • Always measure your ingredients precisely, as accuracy is crucial.
  • Add fragrances, essential oils, and colorants after the soap reaches trace to avoid losing their potency.
  • Handle lye with extreme caution, and ensure you’re working in a well-ventilated area.

Hot Process Soap Making

What Is Hot Process Soap Making?

Hot process soap making is a variation of the cold process method. The key difference is that the soap mixture is heated during the process, which speeds up the saponification reaction. This means that you don’t have to wait weeks for the soap to cure—it can be used much sooner.

Advantages of Hot Process Soap Making

  • Quicker Curing Time: Soap made with the hot process method can be used after 1-2 weeks, making it faster than cold process soap.
  • Easier to Handle: Because the soap is heated, there is less risk of mishandling lye, which makes it safer than the cold process method.
  • Rustic Appearance: Hot process soap often has a textured, rustic look, which many soap makers and users find appealing.

Challenges of Hot Process Soap Making

  • Requires Cooking: You need to cook the soap for 1-3 hours, which requires extra time and attention.
  • Not as Smooth: Hot process soap has a rougher texture and can look less polished than cold process soap.

How to Make Hot Process Soap

  1. Prepare the Ingredients: As with cold process soap, gather your oils, lye, and water.
  2. Mix Lye and Water: Carefully add lye to water and stir until dissolved.
  3. Heat the Oils: Melt your oils (solid oils first) and mix them together.
  4. Combine Lye and Oils: Pour the lye mixture into the oils once both are at around 100°F.
  5. Cook the Soap: Heat the soap mixture over low heat for 1-3 hours, stirring frequently to ensure even cooking.
  6. Blend to Trace: Once the soap has thickened to a pudding-like consistency, pour it into molds.
  7. Cure for a Short Time: Hot process soap doesn’t need as long to cure, so it can be used after 1-2 weeks.

Tips for Hot Process Soap Making

  • Be patient when cooking the soap to ensure that saponification happens correctly.
  • The longer you cook the soap, the harder the final product will be.
  • Customize your soap with colors and fragrances after the cooking process.

Melt and Pour Soap Making

What Is Melt and Pour Soap Making?

Melt and pour soap making is the simplest method of soap making and is ideal for beginners or those looking to make quick, easy soaps. It involves melting pre-made soap bases (which can be purchased at craft stores) and then customizing the soap by adding your own colors, fragrances, and additives.

Advantages of Melt and Pour Soap Making

Advantages of Melt and Pour Soap Making
  • No Lye Required: Since the soap base is already made, you don’t need to handle lye, making this method safe and easy for beginners.
  • Quick and Easy: Melt and pour soap can be ready to use within a few hours after cooling.
  • Customization: You can easily add your own fragrances, colors, and exfoliants to personalize your soap.

Challenges of Melt and Pour Soap Making

  • Limited Control over Ingredients: Since the base is pre-made, you have less control over the ingredients compared to other methods.
  • Less Natural: The pre-made bases may contain artificial fragrances and colors, which might not be ideal for those looking for all-natural soaps.

How to Make Melt and Pour Soap

  1. Choose a Soap Base: Select a pre-made melt and pour soap base such as glycerin, shea butter, or goat’s milk.
  2. Melt the Soap Base: Cut the soap base into small chunks and melt it in a double boiler or microwave.
  3. Add Customizations: Once the soap is fully melted, add your desired fragrances, colors, and other additives like herbs or exfoliants.
  4. Pour into Molds: Pour the melted soap into molds and let it cool and harden. This usually takes 1-2 hours.
  5. Unmold and Use: Once the soap has hardened, remove it from the molds and it’s ready to use.

Tips for Melt and Pour Soap Making

  • Don’t overheat the soap base to avoid burning or ruining its texture.
  • Use essential oils instead of synthetic fragrances for a more natural scent.
  • Consider using clear glycerin base if you want to create layered or transparent soaps.

Rebatch Soap Making

What Is Rebatch Soap Making?

Rebatch soap making is a method where you take already-made soap, shred it, and then heat it again with additional ingredients to create a new soap. This method allows you to customize existing soap while avoiding the need to handle lye.

Advantages of Rebatch Soap Making

  • No Lye Handling: Like melt and pour, rebatch soap making doesn’t require handling lye, making it beginner-friendly.
  • Customization: You can add ingredients like exfoliants, fragrances, and colorants to the pre-made soap.
  • Smooth Texture: Rebatch soap tends to have a smooth texture without the roughness of hot process soap.

Challenges of Rebatch Soap Making

  • Limited Customization: You are essentially starting with a pre-made soap, so you don’t have as much flexibility with the base ingredients.
  • Time Consuming: It takes longer to melt, shred, and cook the soap again.

How to Make Rebatch Soap

  1. Shred the Soap: Use a cheese grater or food processor to shred your existing soap.
  2. Heat the Shredded Soap: Heat the soap in a slow cooker or double boiler, adding water or milk to help it melt.
  3. Add Custom Ingredients: Once the soap is melted, add your colors, fragrances, and other additives.
  4. Mold the Soap: Pour the mixture into molds and allow it to cool and harden.
  5. Cure for a Few Days: Let the soap sit for a few days before using.

Tips for Rebatch Soap Making

  • Use soap that has already been cured for best results.
  • Be patient during the melting process, as it can take time for the soap to fully dissolve.

Conclusion

Choosing the right soap-making method depends on your preferences, available time, and the level of customization you desire. If you enjoy creating natural, customizable soap from scratch, cold process and hot process soap making might be for you. For beginners or those who need a quicker method, melt and pour soap making is an excellent choice. Rebatch soap making is ideal if you want to repurpose existing soap while adding your personal touch.

Each method offers its unique advantages, and no matter which method you choose, soap making can be an enjoyable and rewarding craft. Consider the pros and cons of each approach, and remember, the best method is the one that fits your needs and goals. Happy soap making!

Jessica Reed (Home • Lifestyle)

About Jessica Reed (Home • Lifestyle)

Blogger Home + Lifestyle + Entertaining Daily Life In Stories - CA girl living in NC Wife + Mom Of Three (twin mom) 15 Years Experienced As Blogger Writer at prothotsy.com team Welcome to my prothotsy lifestyle! Im a California girl living on the East Coast, wife, twin mom, blogger and home decor enthusiast. Sharing all things home decor, fashion, lifestyle and more!

Leave a Reply

Your email address will not be published. Required fields are marked *